 NexSHOPX-官方新闻
First, the conclusion: Changing your login password does not mean the recovery channels are yours. Platforms determine "who can recover the account" based on more than just the password. Recovery email and phone number, trusted devices, two-step verification and backup codes, and platform-specific recovery methods can all allow the previous owner to bypass the new password and take back the account.
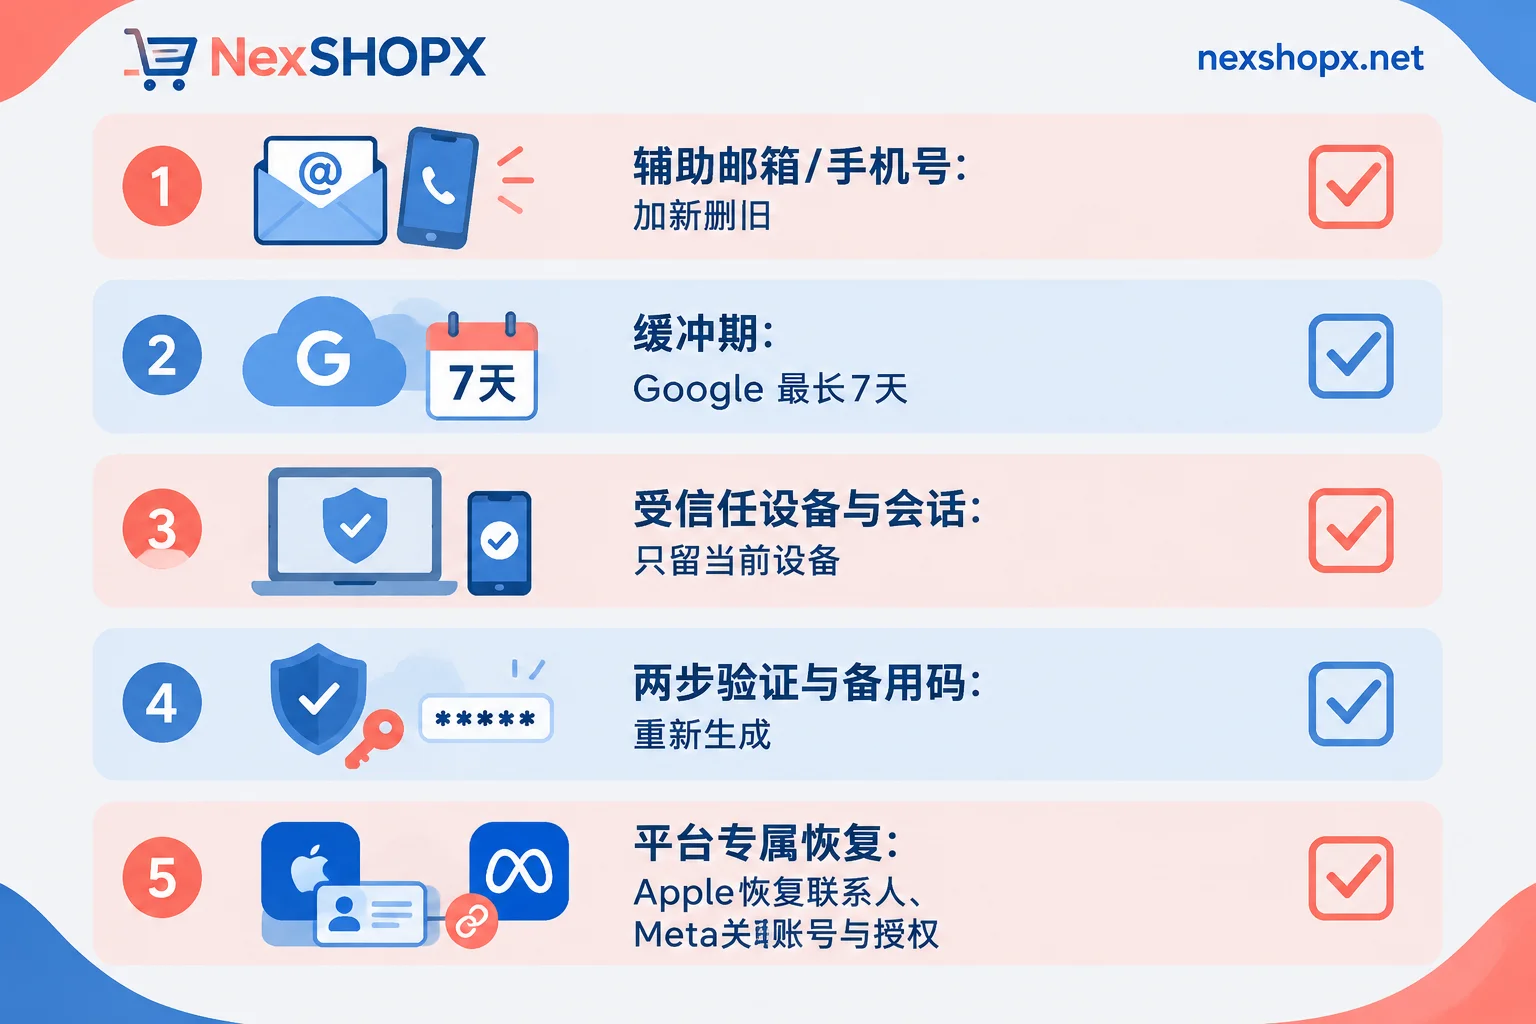
To confirm that the recovery channels truly belong to you, you need to do all of the following:
- Recovery email and recovery phone number contain only yours; delete all old ones.
- All logged-in devices and sessions except the one you are currently using are logged out or removed.
- Two-step verification is re-bound, backup codes are regenerated, and old ones are invalidated.
- Platform-specific recovery methods have no one else bound to them.
- After changing key information, the platform's security buffer period has passed. For Google, this period is up to 7 days.
The following explains the actual order of operations.
Before You Start: Check If the Product Page Allows Changing Details
If the account was purchased, the first step is not to go to the security center, but to return to the product page and check two things.
- First-login time limit: A common rule is that you need to complete the first login within a limited time after placing the order; the specific duration is subject to the product page. For how the time limit is calculated, refer to When should you complete the first login for a purchased account.
- Whether details can be changed during the warranty period: Some categories stipulate that details cannot be modified during the warranty period; if changed, the warranty no longer applies. Changing recovery email, phone number, or two-step verification usually counts as "modifying details." For which changes affect the warranty, see What does it mean that details cannot be changed during the warranty period.
It is recommended to proceed in this order: first log in to confirm the account works normally; then judge based on the product page whether you can make changes. If the product page does not allow changing details, wait until the warranty period ends before completing the full handover. If you are unsure whether an operation counts as changing details, ask customer service first before acting.
Category 1: Recovery Email and Recovery Phone—Add New Ones and Delete Old Ones
The most common oversight is adding your own email but not deleting the old one.
Go to the account's security settings and check item by item:
- Recovery Email: Is it only your email, and has it been verified?
- Recovery Phone: Is it only your number?
- Old registered email, backup email, previously bound phone number: Are any left in the list as secondary options?
Some platforms allow multiple emails per account. For example, a Facebook profile can add or remove multiple emails, so you need to review the entire list, not just the first item. As long as one old contact method remains, the previous owner might receive verification codes through it.
Category 2: After Changing, Wait Out the Platform's Buffer Period
This point is often overlooked. Google's official documentation clearly states: after changing the recovery phone or recovery email, the system may still send verification codes to the old contact methods for up to 7 days to prevent account theft.
In other words, on the day of the change, the old channels are not completely invalidated. It is recommended to:
- Note the date of the change.
- During this period, watch for any unusual login or recovery alerts on the account.
- After 7 days, return to security settings and confirm that the contact methods have not been changed back.
Other platforms may not have the same rule, nor necessarily 7 days. Before confirming, do not assume "changes take effect immediately."
Category 3: Trusted Devices and Login Sessions—Clear Them All
Trusted devices on many platforms can initiate password resets without security verification or prevent you from modifying information elsewhere. Google's device management, Apple's trusted device list, and Meta's login device management all have such mechanisms.
How to do it: In the security center, find "Logged-in devices" or "Active sessions," and log out or remove every device except the one you are currently using. For Apple accounts, also separately check the trusted devices and trusted phone numbers lists.
Why the other party can still log in after you change the password, and why sessions, authorizations, and recovery entry points must all be closed together, is explained in more detail in this article.
Category 4: Two-Step Verification and Backup Codes—Regenerate Them
If the account has two-step verification enabled, the following may still be in the previous owner's hands:
- The secret key in the authenticator app (TOTP).
- Passkey or physical security key.
- Previously downloaded one-time backup codes (usually a set of 8 to 10 digits).
These can bypass the password for verification. How to handle:
- Regenerate backup codes; old codes are automatically invalidated, and save the new codes yourself.
- Re-bind the authenticator by scanning the QR code again on your own device.
- Check the passkey and security key list and delete any you do not recognize.
Category 5: Platform-Specific Recovery Methods and Third-Party Authorizations
Some platforms have their own unique recovery paths that a general checklist cannot cover:
- Apple Account: Check whether anyone else is in "Account Recovery Contacts" and whether a recovery key has been set. If the recovery key was not generated by you, handle it again.
- Meta / Facebook: Check which accounts are linked in the Accounts Center, then check "Apps and Websites" for third-party authorizations, and remove any unnecessary or unknown ones.
The location and names of settings vary by platform; refer to the actual page in the respective platform's security center.
Situations You May Encounter When Changing Details
If you log in for the first time in a new environment and immediately change the password, contact methods, and two-step verification all at once, some platforms may require additional verification, such as face or ID verification. There is no publicly fixed standard for when platforms trigger such verification, so it is not possible to give an exact time interval or sequence of operations here.
If this happens, follow the platform's prompts. If the account is still within the warranty period or you encounter login issues, you can first gather the order number, error screenshots, and operation times before contacting after-sales support. For what information to prepare, refer to What information to provide to the seller's after-sales when login fails.
For accounts used by a team, it is recommended to record the check results and modification dates for each item above in the handover record for future reference. For a template, see How to write an account handover checklist.
Check the Conditions Before Purchasing
If you have not yet placed an order and plan to fully manage the recovery channels yourself after taking over, focus on three things when choosing a product: how long the first-login time limit is, how long the warranty period is, and whether details can be changed during the warranty period. These three determine when you can perform the handover above.
For example, for Google accounts, you can compare different specifications on NexSHOPX's Google category page. The first-login time limit and warranty conditions for each product follow the product page descriptions; for general warranty rules, see the terms page.


Comments(0)